June 20, 2013

Cocktail bun


I had almost quit blog writing after I gave birth to my son. Caring for a newborn leaves you feeling guilty doing anything else. In the chaos of new parenthood with small tasks that never end, food bloggingfrom finding angles for photos to jotting down details of a recipegives me a sense of accomplishment when I can see through the birth of a post til the end. It takes me back to my pre-motherhood self.

Yet, cooking itself could be a mess when you have a restless child, especially they cry when your hands are drenched in some gooey mixture of butter, egg, and flour. That said, the stress is actually pretty short-lived when you can literally smell the finished product in your head.

This is why I choose to make the cocktail bun, a buttery and coconuty brioche roll with an aroma so desirable that all those kneading and shaping are well worth the efforts. The freshly baked cocktail buns smell heavenly: you can literally single out the coconut in the air. Next come the golden crust and a little bit of sesame garnish that visually complement the buns. Last but not least, you are ultimately swept away by the soft and fluffy crumb that wraps around a velvety and hearty coconut filling.

Sweet Heart Cake Shop is a bakery I always frequented back in Hong Kong
The cocktail bun gets its name not from any use of spirits but from the use of baking scrap mixtures, which reminds me of the humble origin of the British crumble. These buns represent the essence of Hong Kong-style: appropriating foreign ingredients to create a localized version in a minimal and economical fashion. Bakeries in Hong Kong are as ubiqitous as Starbucks in the US. These buns are hugely popular among the locals. To busy students and workers, they are a meal of its own when paired with lemon tea or malt milk.

My husband loves these buns. They have even become our late night nostalgia snacks, something to munch on after a busy day with our baby. It takes us to our remembered pleasure, a pre-parenthood youth and innocence that pressured new parents hunger for.


Cocktail bun
recipe adapted from SandyWanCooks
makes about 10 buns

Dough:
2 1/4 cups bread flour
1/4 cup sugar
1 tablespoon milk
1 tsp yeast
5 oz luke-warm water
1  large egg
2 tbsp butter

Filling:
1/2 cup or 1 stick butter
1/3 cup flour
1/4 cup sugar
1/4 cup coconut flakes

1 egg for egg wash
sesame seeds for garnish

Dissolve yeast in luke-warm water. Mix the ingredients for the dough. It's okay if you find the dough sticky; it is supposed to be that way, just like a brioche dough. The more you knead, the more elastic and less sticky the dough turns out, and the happier you'll be with your hands free of sticky bits that are hard to get rid of. So knead the dough until it windowpanes, about 10 minutes. The resulting bread will be flaky and airy. Set the dough in an oiled bowl and cover with a plastic wrap. Let rise until it's doubled in size, about 1 hour. (Tips: I'd clean the work surface now for the mess coming up.)

Punch the risen dough. Shape the dough into 10 tiny balls. Let rise for about 20 minutes. While waiting, mix the ingredients of filling and divide it into 10 equal parts.

Pat the tiny balls with your heel of the palm and put the filling in. Let rise again until it's doubled in size. The second rise is crucial in helping build the structure of the bread.

Preheat the oven to 375°F 20 minutes before baking. Beat an egg for egg wash. Apply it in three strokes. Sprinkle sesame seeds for garnish. Bake for 13-15 minutes or until golden brown.

May 08, 2013

My mom-in-law's rooftop garden 2013 spring

scallion

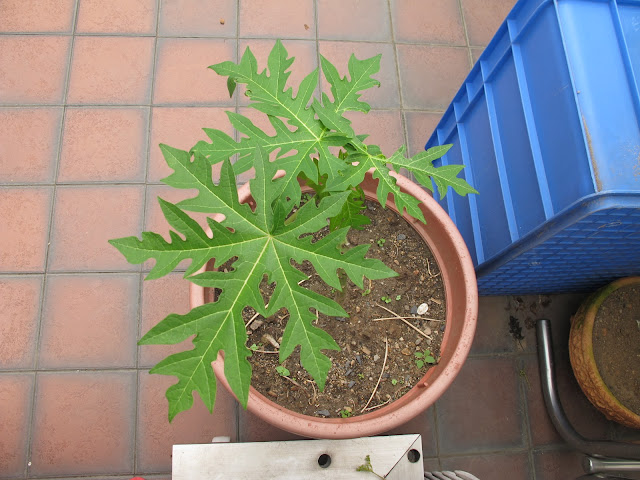
I'm back in Hong Kong again. It has become almost a ritual to check out what my mom-in-law is growing everytime when I'm home. What is even more special this year is that most of my son's food comes from here! And to my surprise, he loves what I hate: beet.


beet

tianqi (a kind of Chinese herb)

yam leaves

papaya

pomegranate

April 28, 2013

Lotus root chips

My son is already 11 months old. When I wrote my last entry on steamed potatoes five months ago, I didn't foresee what was to come: mealtime struggles. The fear of rejection and stress plagues me everytime when mealtime comes. Apparently babies cannot be manipulated when it comes to eatingthey simply keep their mouths shut. To get my son to eat, we exhaust every possible distraction technique, such as using lots of props, so that we can quickly shovel spoonfuls of what we call "food" - purees of unidentifiable ingredients - into his mouth. We sing too; sometimes we even bark and meow.

That he is unaware of the act of eating really troubles me. I'm secretly keeping my fingers crossed this distraction technique won't persist into his toddlerhood! That's why I'm also sitting him next to us during adult mealtimes and giving him bits and pieces of what we eat as his finger food, even letting him squish and squash them in a playful manner. He's still in his mouthing stage, probing the world by tasting everything within his reach. Needless to say, I'm not particularly impressed that his favorite "food" is remote control and my cell phone. I just wish his curiousity in biting can replicate on the dining table.

That said, as a mom of a restless child, I need to bring out the sensory and textual appeal of the food I serve in a more playful way. We love stimulation, don't we? That's when lotus root comes in. I can imagine my son poking his fingers to fit in those tiny holes of the plant when cut crosswise. The shape of the chips resembles flowers. How beautiful! Its texture is a cross between crisp apple and mealy potato; its taste a subtle earthiness that reminds one of its origin—a rhizome, or underground stem—of the lotus plant that is often associated with modesty and purity.
 

Lotus Root Chips

Time: 30 minutes
Yield: 2 servings
 
1 section lotus root, medium sized, about 1/2 pound
pinch of salt and pepper
olive oil
 
Preheat oven to 400°F. Bring to boil a pot of water and boil the lotus root for 10 minutes. (Preboiling yields a chewy texture that compliments greatly with crisp crust but it's optional.) Slice lotus root, either peeled or unpeeled, into 1/8 inch chips. Coat the chips evenly with enough olive oil. Spread the chips evenly on a greased baking sheet and sprinkle with salt and pepper. Bake for 10 to 15 minutes on one side before turning; then bake for 5 minutes more or until golden brown. Enjoy! These lotus root chips will definitely spark some curiousity in little minds.


April 22, 2013

A home-cooked meal of late 1970s Hong Kong


This picture shows my dad and grandma (in the center of the picture) enjoying a scrumptious home-cooked meal with guests in a tiny apartment they rented when they first immigrated to Hong Kong from Meixian, China. I wasn't born yet. My mother was still in China. There were five dishes, which I couldn't figure out what they were, and one soup. Despite the modest and simple decor in the apartment they live in, dinnerware used was exquisitely decorated. I can imagine how important a proper dinner meant to themback then as new immigrants in an exotic land.


November 30, 2012

baby food—delicious steamed sweet potatoes

Thinly sliced sweet potatoes ready to be steamed


This past week began what I hailed as the most important journey for me as a homecook: cooking first solid foods for my baby! My son, Nuree, is six months old. I felt as if I have graduated from some sort of elementary school for parenting! And for my son, eating solids start out as a fun and playful event without him knowing the nourishment food provides. He's certainly embarking on a lifelong pursuit of gastromonic pleasures.

He tasted his first food—colostrum, or first milk, a form of milk that boosts a newborn's immune system and is packed with nutrients—from my breasts just shy of an hour leaving my womb. Six months have past and I'm now excited to prepare his first real solid food.

Cooking for baby presents a new set of challenge: what to introduce first for baby's vulnerable and tiny body? How best to cook it to preserve nutrients? What shapes and textures work best for my baby's not yet developed chewing skills? How to work the process into the preparation of our routine family meals?

So last week after much research, I came up with sweet potatoes for its similarity to breastmilk's sweetness. I boiled the sweet potato first and then pureed it in the blender, while imagining the happy smiley face on my little one when I feed the sweet potatoes into his mouth. Yet what happened was he not only gagged, but spit up the whole thing after I fed him a good tablespoon of food.

A week after, I tried again, with a new method—steaming. Not only did he like it this time, he opened his mouth automatically spoonful after spoonful in anticipation of the awesomeness of solid foods. And the beauty of steaming is that it preserves nutrients best and takes only 10 minutes. It's so easy that a recipe may sound redundant but I'll try my best to lay it out here.

Very delicious steamed sweet potato for baby

Time: 15 minutes, includes 10 minutes of cooking
Serving: 10-12 ice tray cubes

Ingredients:
1 small to medium sweet potato, peeled

Bring the water to a roaring boil in the steamer or a wok steaming set-up. Slice the sweet potato very thinly and put them on a shallow plate. Place the plate on the steaming rack, cover, and steam for 10 minutes or until soft to the fork/spoon, whichever untensil you're using to mash the sweet potatoes to appropriate baby food texture. For your own entertainment, feed the baby with a blue spoon ;)


May 21, 2012

Snow peas with Swai

Snow peas fish 5-18-12

One of my early childhood kitchen memories involves helping my mom sanpping the ends of snow peas to remove the strings. To this date, I still don't know why the strings need to be removed. (Perhaps for a smoother mouthfeel?) I have literally internalized this practice as a ritual. With the imminent roaring summer, I crave for snow peas. Saying "snow peas" out loud has a magical cooling effect on me, let alone seeing the bright green color and eating the crisp and snappy pods that sing of springs and summers.

Swai, or Pangasius hypophthalmus, is a sweet tasting, fleshy, and flaky fish from the catfish family for cost-conscious home cooks like me. The mild flavor complements vegetables that bear distinct tastes perfectly.

Snow peas fish b 5-18-12
Snow peas with Swai

Time: 20 minutes
Yield: 2-3 servings

1 Swai fillet, about 9 oz, sliced diagonally into nuggets
1 tablespoon soy sauce
a pinch of sugar
a pinch of white pepper
1 teaspoon rice wine
1 tablespoon cornstarch
1 teaspoon oil
2 tablespoons oil
2 slices ginger
3 cloves garlic, chopped
2 oz snow peas, about 1 cup or 20 pieces, strings removed
¼ cup wood ears, soaked and cut into strips

Marinate Swai nuggets with soy sauce, sugar, white pepper, rice wine, cornstarch, and oil.

Heat 2 tablespoons oil over medium high heat. (When pan-frying fish, I like using nonstick skillet.) Add ginger and stir-fry until fragrant. One by one, put Swai nuggets into the skillet. Pan-fry each side until slightly browned, about 3 minutes on each. Remove from skillet and set aside.

With the remaining oil, add garlic into the skillet and stir-fry until fragrant. Add snow peas and wood ears and stir-fry until soft, about 1 minute. Return Swai nuggets into the skillet and stir-fry, about 30 seconds. Cover and let steam, about 1 minute. (If there is excess water and the dish looks loose, mix 1 teaspoon cornstarch and 1 teaspoon water as slurry to thicken the dish.) Remove from heat and serve.


May 17, 2012

Steamed eggs with shiitake mushrooms

Steamed egg e 5-13-12

A healthful Asian home-cooking blog isn't proper if such a simple yet nourishing dish as steamed eggs isn't covered. Everytime when I return home, I would behave like a spoiled kid and have my parents and my grandma cooked steamed eggs for me, as breakfast, lunch and dinner. Theirs are always the best.

Steam two eggs mixed with water that doubles the amount. Seems easy enough? But it can be the most puzzling dish to a home cook. The Chinese call it steamed "watery" egg, stressing the fludity that melts in your mouth, as opposed to the unyielding flavor and texture of an overcooked egg. So how to achieve an impeccable "watery" sensation?

It came to me as a big revelation one day when I prepared lunch with my grandma. I always knew her as a meticulous person. As one of the few women to receive education in a rural Chinese town back in the 30s, she went on to become the first female teachers in her village. But never did I know that a dish as seemingly easy as steamed eggs would trigger her "teacher" spirit in front of her granddaughter.

"You must use boiled water," she said seriously and as an 80-year-old, ran as swiftly as she could to stop me from using tap water.

"Don't you see there are still air bubbles on the surface?" which implied more work from my end when I was about to put the dish into the wok for steaming.

Deep down I thought those were merely gestures used by cookbook authors or food show hosts to establish their authority. But now these instructions came from my grandma, which meant I had to listen. The end result? It's steamed eggs in its best form I've ever achieved.

It was such a liberating moment to finally find out the keys (laid out below) to making this classic dish and that, these tips came not from cookbooks but from my very own family.

Steamed egg d 5-13-12

Steamed egg

Here, I'm sharing with you three steps to impeccably silky steamed eggs: (1) use previously boiled water at room temperature; (2) scoop away air bubbles after eggs are beaten with water; and (3) leave a 1/4 to 1/2 inch gap between the lid and the wok or whatever pots you're using when steaming to let out steam, thus preventing bubbles formed on the surface of the finished dish.

Steamed eggs can also be a great canvas for your imagination, such as Japanese chawanmushi, Korean gyeran jjim, with filling like minced pork, or toppings like cavier. Or you can mix the eggs with clear noodles (pre-soak it with hot water before mixing with the egg) and dried shrimps, which puntuate the egg dish in a pungent flavor and chewy texture. It's the Hong Kong classic style: 蝦米粉絲蒸蛋。

Time: 20 minutes (cooking time depends on the type of steaming set-up and the size of the serving dish)
Yield: 2 servings

2 eggs, egg shells reserved for measuring water
8 half-egg-shells boiled water at room temperature. If you don't have boiled water, boil some real quick and freeze it immediately for roughly 15 minutes or until chilled.

pinch of salt
water for steaming
1 mushroom, soaked (or microwave with water for 1 minute to reconsitute quickly) and sliced to as thin as possible
2 tbsp oil

2 tbsp green onions, julienned
2 tbsp soy sauce
  1. Bring a pot/wok of water to a roaring boil on high. (See my steaming set-up).
  2. In a shallow and wide bowl/serving dish (mine was a 2.5" x 7"), beat two eggs. Reserve the egg shells for measuring water. 
  3. Choose a half-egg-shell as your measuring cup. Measure previously boiled water up to twice the amount of eggs. For every one egg used, add four half-egg-shells of water. In this case, eight half-egg-shells. Add a pinch of salt. Beat well. Scoop away air bubbles on the surface.
  4. Turn the heat down to medium. Place the egg dish on a steaming rack. Cover with a lid but leave a ¼- to ½-inch gap. Steam for about 10 minutes.
  5. Open the lid and check for doneness with a fork. The eggs should have achieved a stable consistency. Add mushroom slices on top and steam for 3 more minutes.
  6. In another pan, heat 2 tablespoon oil to the point of just before getting smoked.
  7. Open the lid and check for doneness again. If the egg is not set, steam for another minute. Otherwise, pour away the water settled on top of the dish and garnish the dish with julienned green onions.
  8. Pour the heated oil over the dish and dress with soy sauce. Serve with plain rice.